Automatiser l'extinction de mes appareils via Proxmox et onduleur eaton

Ma configuration

System Information

version core-2022.10.1
installation_type Home Assistant OS
dev false
hassio true
docker true
user root
virtualenv false
python_version 3.10.5
os_name Linux
os_version 5.15.67
arch x86_64
timezone Europe/Paris
config_dir /config
Home Assistant Community Store
GitHub API ok
GitHub Content ok
GitHub Web ok
GitHub API Calls Remaining 4922
Installed Version 1.28.2
Stage running
Available Repositories 1125
Downloaded Repositories 12
Home Assistant Cloud
logged_in false
can_reach_cert_server ok
can_reach_cloud_auth ok
can_reach_cloud ok
Home Assistant Supervisor
host_os Home Assistant OS 9.0
update_channel stable
supervisor_version supervisor-2022.10.0
agent_version 1.3.0
docker_version 20.10.17
disk_total 30.8 GB
disk_used 4.3 GB
healthy true
supported true
board ova
supervisor_api ok
version_api ok
installed_addons File editor (5.4.1), Samba share (10.0.0), Duck DNS (1.15.0), MariaDB (2.5.1), Terminal & SSH (9.6.1), Network UPS Tools (0.11.0)
Dashboards
dashboards 1
resources 8
views 7
mode storage
Recorder
oldest_recorder_run 11 octobre 2022 à 07:35
current_recorder_run 19 octobre 2022 à 23:36
database_engine mysql
database_version 10.6.8

image


Bonsoir,

Pour protéger mon installation, j’ai opté pour cet onduleur, le EATON Ellipse Pro 650. J’ai réussi à l’intégrer à HA et récupérer quelques infos (merci Pulpy pour la carte).

Maintenant j’aimerai bien créer une automatisation dans Proxmox pour que mes appareils s’éteignent proprement à la suite d’une coupure de courant qui viendrait s’éterniser et également que tout se remette en marche à l’issue de la coupure.

Mais je suis navré mais je ne sais pas du tout comment m’y prendre…

En gros, sur mon onduleur, j’ai le NUC de brancher avec Proxmox et la VM de HA, un dvr ANNKE avec 8 caméras, la livebox. et un switch port ethernet.

J’ai pu lire des sujets ici qui évoquent la manip mais sincèrement c’est trop complexe pour moi.

Je sollicite donc votre aide pour effectuer les manips nécessaires.

Merci à vous.

Hello

Tu as pas etais sur le forum HA si il y a avais pas un blueprint ??

Je prefererai que se soit proxmox qui gere l’onduleur et non ha

Salut
J’ai partagé cette solution complète ici aussi (3 fichiers).

Si c’est cette méthode qui est trop complexe, que faire ?

Effectivement ça à l’air tellement simple et evident pour toi… Mais je suis loin d’avoir tes compétences !
S’il n’y avait que du copier coller à faire la difficulté serait moindre mais comment installer nut dans proxmox ?
Et où coller 3 parties que tu donnes ?

N’importe quel tutoriel Linux est valable. Proxmox c’est une base debian.
Un au hasard Installer et surveiller votre onduleur sous Debian

C’est indiqué dans mon sujet, je donne le chemin et le nom des 3

On est vraiment pas loin du copier / coller mais dans tous les cas il faut lire et comprendre pour éviter les mauvaises surprises

Je te remercie :+1:. Apres oui comprendre, on ne comprend pas tous à la même vitesse :innocent:

Bonjour

Il me semblait bien avoir donné cette information
encore un autre tuto pour installer NUT dans Proxmox .

bonne journée

Bonsoir, bon j’ai tenté d’appliquer la procédure mais je ne suis pas sûre d’avoir tout bon…

voici ce que ça dit lorsque je tape
nano /etc/init.d/ups-monitor status

#! /bin/sh
### BEGIN INIT INFO
# Provides:          nut-client upsmon ups-monitor
# Required-Start:    $local_fs $syslog $network $remote_fs
# Required-Stop:     $local_fs $syslog $network $remote_fs
# Should-Start:      nut-server
# Should-Stop:       
# Default-Start:     2 3 4 5
# Default-Stop:      0 1 6
# Short-Description: Network UPS Tools monitor initscript
# Description:       This script take care of starting and stopping the
#                    Network UPS Tools monitoring component (upsmon).
### END INIT INFO

# Author: Arnaud Quette <aquette@debian.org>

PATH=/sbin:/usr/sbin:/bin:/usr/bin:/usr/local/sbin:/usr/local/bin

NAME=nut-client
DESC="NUT - power device monitor and shutdown controller"
CONFIG=/etc/nut/nut.conf
pid_dir=/run/nut
upsmon_pid=${pid_dir}/upsmon.pid
upsmon=/sbin/upsmon
log=">/dev/null 2>/dev/null"

# Define LSB log_* functions.
# Depend on lsb-base (>= 3.0-6) to ensure that this file is present.
. /lib/lsb/init-functions

# set upsmon specific options. use "man upsmon" for more info
# this parameter is now located in nut.conf, and not in /etc/default/nut anymore
# FIXME: retrieved from 'nut' script during update 
UPSMON_OPTIONS=""

# Exit if the package is not installed
[ -x "$upsmon" ] || exit 0

# Include NUT nut.conf
[ -r $CONFIG ] && . $CONFIG

# FIXME: put all common bits, between nut-client and nut-server,
# into a common nut-function

# Explicitly require the configuration to be done in /etc/nut/nut.conf
if [ "x$MODE" = "xnone" -o -z "$MODE" ] ; then
    log_action_msg "$NAME disabled, please adjust the configuration to your needs"
    log_action_msg "Then set MODE to a suitable value in $CONFIG to enable it"
    # exit success to avoid breaking the install process!
    exit 0
fi

# Check if /run/nut exists and has the correct perms
check_var_directory() {
  [ ! -d ${pid_dir} ] && mkdir -p ${pid_dir} \
    && chown root:nut ${pid_dir} \
    && chmod 770 ${pid_dir} \
    && [ -x /sbin/restorecon ] && /sbin/restorecon ${pid_dir}
}

# check if the right components are running
check_status() {
  case "$MODE" in
    standalone|netserver|netclient)
      status_of_proc -p $upsmon_pid $upsmon upsmon
      ;;
    none|*)
      ;;
  esac
}

start_stop_client () {
  case "$MODE" in
    standalone|netserver|netclient)
      # FIXME: for standalone|netserver, ensure 'nut-server status' returns ?
      case "$1" in
        start)
          start-stop-daemon -S -q -p $upsmon_pid -x $upsmon \
              -- $UPSMON_OPTIONS >/dev/null 2>&1 && return 0 || return 1
          ;;
        stop)
          start-stop-daemon -K -o -q -p $upsmon_pid -n upsmon >/dev/null 2>&1 \
            && return 0 || return 1
          ;;
      esac
      ;;
    none|*)
      return 1
      ;;
  esac
}

case "$1" in

  start)
    log_daemon_msg "Starting $DESC" "$NAME"
    check_var_directory
    start_stop_client start
    log_end_msg $?
    ;;

  stop)
    log_daemon_msg "Stopping $DESC" "$NAME"
    start_stop_client stop
    log_end_msg $?
    ;;

  reload)
    log_daemon_msg "Reloading $DESC" "$NAME"
    $upsmon -c reload >/dev/null 2>&1
    log_end_msg $?
    ;;

  restart|force-reload)
    # FIXME: lack consistency, due to initscript split.
    # This only addresses partial reload.
    # Full reload requires to:
    # - stop nut-client
    # - restart (Ie stop+start) nut-server
    # - start nut-client
    log_daemon_msg "Restarting $DESC" "$NAME"
    start_stop_client stop || true
    # should then 'start_stop_server stop', Ie /etc/init.d/nut-server stop
    #sleep 5
    check_var_directory
    # should first 'start_stop_server start', Ie /etc/init.d/nut-server start
    start_stop_client start
    log_end_msg $?
    ;;

  status)
    #log_daemon_msg "Checking status of $DESC"
    echo "Checking status of $DESC"
    check_status
    exit $?
    ;;

  poweroff)
    case "$MODE" in
      standalone|netserver)
        # Sanity check
        flag=`sed -ne 's#^ *POWERDOWNFLAG *\(.*\)$#\1#p' /etc/nut/upsmon.conf`
        if [ -z "$flag" ] ; then
          log_action_msg "##########################################################"
          log_action_msg "## POWERDOWNFLAG is not defined in /etc/nut/upsmon.conf ##"
          log_action_msg "##                                                      ##"
          log_action_msg "## Please read the Manual page upsmon.conf(5)           ##"
          log_action_msg "##########################################################"
          exit 1
        fi
        # Defer to nut-server to actually poweroff the UPS, if needed
        # (the need is tested here though!)
        if $upsmon -K >/dev/null 2>&1 ; then
          log_daemon_msg "UPS poweroff required..."
          log_end_msg 0
          if [ -x /etc/init.d/nut-server ] ; then
            exec /etc/init.d/nut-server poweroff
          else
            log_action_msg "Failure: /etc/init.d/nut-server script missing"
          fi
        else
          log_action_msg "Power down flag is not set (UPS poweroff not needed)"
        fi
        ;;
      none|netclient|*)
        # nothing to do
        log_action_msg "'$MODE' configuration does not require UPS poweroff"
        ;;
    esac
    ;;

  *)
    N=/etc/init.d/$NAME
    echo "Usage: $N {start|stop|reload|restart|force-reload|status|poweroff}" >&2
    exit 1
    ;;
esac

exit 0

Pourquoi nano devant la commande ?
Il faut exécuter le script, pas l’éditer

Merci Pulpy, mais si je met sans nano y’a rien qui se passe. Ou alors je ne sais pas executer la commande.

Mettre nano change le comportement donc, c’est de toute façon pas une meilleure solution :wink:
La commande EST excutable, donc il n’y a rien de plus à faire pour que ce soit possible.
Es tu root ? Si non ajoute sudo à la place de nano

Je suis bien root. Je ne sais pas ce que j’ai foutu…

J’ai suivi ce tuto : Installer et surveiller votre onduleur sous Debian (linkedin.com)

Voici ce que j’ai fait à l’étape configuration, est ce que je n’ai pas oublié quelque chose des fois ?

# Network UPS Tools: example ups.conf
#
# --- SECURITY NOTE ---
#
# If you use snmp-ups and set a community string in here, you 
# will have to secure this file to keep other users from obtaining
# that string.  It needs to be readable by upsdrvctl and any drivers,
# and by upsd.
#
# ---
#
# This is where you configure all the UPSes that this system will be
# monitoring directly.  These are usually attached to serial ports, but
# USB devices and SNMP devices are also supported.
#
# This file is used by upsdrvctl to start and stop your driver(s), and
# is also used by upsd to determine which drivers to monitor.  The 
# drivers themselves also read this file for configuration directives.
#
# The general form is:
# 
# [upsname]
#       driver = <drivername>
#         port = <portname>
#       < any other directives here >
#
# The section header ([upsname]) can be just about anything as long as
# it is a single word inside brackets.  upsd uses this to uniquely 
# identify a UPS on this system.
#
# If you have a UPS called snoopy, your section header would be "[snoopy]".
# On a system called "doghouse", the line in your upsmon.conf to monitor
# it would look something like this:
#       MONITOR snoopy@doghouse 1 upsmonuser mypassword master
#
# It might look like this if monitoring in slave mode:
#
#       MONITOR snoopy@doghouse 1 upsmonuser mypassword slave
#
# Configuration directives
# ------------------------
#
# These directives are used by upsdrvctl only and should be specified outside
# of a driver definition:
#
#    maxretry: Optional.  Specify the number of attempts to start the driver(s),
#              in case of failure, before giving up. A delay of 'retrydelay' is
#              inserted between each attempt. Caution should be taken when using
#              this option, since it can impact the time taken by your system to
#              start.
#
#              The default is 1 attempt.
#
#  retrydelay: Optional.  Specify the delay between each restart attempt of the
#              driver(s), as specified by 'maxretry'. Caution should be taken
#              when using this option, since it can impact the time taken by your
#              system to start.
#
#              The default is 5 seconds.
# 
# These directives are common to all drivers that support ups.conf:
#
#  driver: REQUIRED.  Specify the program to run to talk to this UPS.  
#          apcsmart, bestups, and sec are some examples.
#
#    port: REQUIRED.  The serial port where your UPS is connected.  
#          /dev/ttyS0 is usually the first port on Linux boxes, for example.
#
# sdorder: optional.  When you have multiple UPSes on your system, you
#          usually need to turn them off in a certain order.  upsdrvctl
#          shuts down all the 0s, then the 1s, 2s, and so on.  To exclude
#          a UPS from the shutdown sequence, set this to -1.
#
#          The default value for this parameter is 0.
#
#  nolock: optional, and not recommended for use in this file.
#
#          If you put nolock in here, the driver will not lock the
#          serial port every time it starts.  This may allow other 
#          processes to seize the port if you start more than one by 
#          mistake.
#
#          This is only intended to be used on systems where locking
#          absolutely must be disabled for the software to work.
#
# maxstartdelay: optional.  This can be set as a global variable
#                above your first UPS definition and it can also be
#                set in a UPS section.  This value controls how long
#                upsdrvctl will wait for the driver to finish starting.
#                This keeps your system from getting stuck due to a
#                broken driver or UPS.
#
#                The default is 45 seconds.
# synchronous: optional.  The driver work by default in asynchronous
#              mode (i.e *synchronous=no*).  This means that all data
#              are pushed by the driver on the communication socket to
#              upsd (Unix socket on Unix, Named pipe on Windows) without
#              waiting for these data to be actually consumed.  With
#              some HW, such as ePDUs, that can produce a lot of data,
#              asynchronous mode may cause some congestion, resulting in
#              the socket to be full, and the driver to appear as not
#              connected.  By enabling the 'synchronous' flag
#              (value = 'yes'), the driver will wait for data to be
#              consumed by upsd, prior to publishing more.  This can be
#              enabled either globally or per driver.
#
#              The default is 'no' (i.e. asynchronous mode) for backward
#              compatibility of the driver behavior.
#
# Anything else is passed through to the hardware-specific part of
# the driver.
# 
# Examples
# --------
#
# A simple example for a UPS called "powerpal" that uses the blazer_ser
# driver on /dev/ttyS0 is:
#
# [powerpal]
#       driver = blazer_ser
#       port = /dev/ttyS0
#       desc = "Web server"
#
# If your UPS driver requires additional settings, you can specify them
# here.  For example, if it supports a setting of "1234" for the
# variable "cable", it would look like this:
# 
# [myups]
#       driver = mydriver
#       port = /dev/ttyS1
#       cable = 1234
#       desc = "Something descriptive"
#
# To find out if your driver supports any extra settings, start it with
# the -h option and/or read the driver's documentation.

# Set maxretry to 3 by default, this should mitigate race with slow devices:
maxretry = 3
[eaton]
driver = usbhid-ups
port = auto
desc = "Eaton Ellipse PRO 650"

Du coup, c’est pas vraiment le sujet ? Tu es coincé sur la partie configuration de l’ups. Pas du tout sur comment mettre en place l’arrêt des VM, correct ?

excat…me suis planté de lieu

je voulais poster ici : Automatiser l’extinction de mes appareils via Proxmox et onduleur eaton - Entraide Home Assistant - Home Assistant Communauté Francophone (hacf.fr)

Bon dans le tuto, il a des étapes pour vérifier que la partie nut est opérationnel… c’est le cas chez toi ?
Le step 4 est ok ?

Tout était ok alors je suis passé à l’étape 5.

root@proxmox:~# upsdrvctl start
Network UPS Tools - UPS driver controller 2.7.4
Network UPS Tools - Generic HID driver 0.41 (2.7.4)
USB communication driver 0.33
Using subdriver: MGE HID 1.40

J’ai donc fait ça :
nano /etc/nut/nut.conf

# Network UPS Tools: example nut.conf
#
##############################################################################
# General section
##############################################################################
# The MODE determines which part of the NUT is to be started, and which
# configuration files must be modified.
#
# This file try to standardize the various files being found in the field, like
# /etc/default/nut on Debian based systems, /etc/sysconfig/ups on RedHat based
# systems, ... Distribution's init script should source this file to see which
# component(s) has to be started.
#
# The values of MODE can be:
# - none: NUT is not configured, or use the Integrated Power Management, or use
#   some external system to startup NUT components. So nothing is to be started.
# - standalone: This mode address a local only configuration, with 1 UPS 
#   protecting the local system. This implies to start the 3 NUT layers (driver,
#   upsd and upsmon) and the matching configuration files. This mode can also
#   address UPS redundancy.
# - netserver: same as for the standalone configuration, but also need
#   some more network access controls (firewall, tcp-wrappers) and possibly a
#   specific LISTEN directive in upsd.conf.
#   Since this MODE is opened to the network, a special care should be applied
#   to security concerns.
# - netclient: this mode only requires upsmon.
#
# IMPORTANT NOTE:
#  This file is intended to be sourced by shell scripts.
#  You MUST NOT use spaces around the equal sign!

# MODE=none
MODE=standalone

Etape 6 :
nano /etc/nut/upsd.conf

# Network UPS Tools: example upsd configuration file
#
# This file contains access control data, you should keep it secure.
#
# It should only be readable by the user that upsd becomes.  See the FAQ.
#
# Each entry below provides usage and default value.

# =======================================================================
# MAXAGE <seconds>
# MAXAGE 15
#
# This defaults to 15 seconds.  After a UPS driver has stopped updating
# the data for this many seconds, upsd marks it stale and stops making
# that information available to clients.  After all, the only thing worse
# than no data is bad data.
#
# You should only use this if your driver has difficulties keeping
# the data fresh within the normal 15 second interval.  Watch the syslog
# for notifications from upsd about staleness.

# =======================================================================
# STATEPATH <path>
# STATEPATH /var/run/nut
#
# Tell upsd to look for the driver state sockets in 'path' rather
# than the default that was compiled into the program.

# =======================================================================
# LISTEN <address> [<port>]
# LISTEN 127.0.0.1 3493
# LISTEN ::1 3493
#
# This defaults to the localhost listening addresses and port 3493.
# In case of IP v4 or v6 disabled kernel, only the available one will be used.
#
# You may specify each interface you want upsd to listen on for connections,
# optionally with a port number.
#
# You may need this if you have multiple interfaces on your machine and
# you don't want upsd to listen to all interfaces (for instance on a
# firewall, you may not want to listen to the external interface).
#
# This will only be read at startup of upsd.  If you make changes here,
# you'll need to restart upsd, reload will have no effect.

# =======================================================================
# MAXCONN <connections>
# MAXCONN 1024
#
# This defaults to maximum number allowed on your system.  Each UPS, each
# LISTEN address and each client count as one connection.  If the server
# runs out of connections, it will no longer accept new incoming client
# connections.  Only set this if you know exactly what you're doing.

# =======================================================================
# CERTFILE <certificate file>
# CERTFILE /usr/local/ups/etc/upsd.pem
#
# When compiled with SSL support with OpenSSL backend,
# you can enter the certificate file here.
# The certificates must be in PEM format and must be sorted starting with
# the subject's certificate (server certificate), followed by intermediate
# CA certificates (if applicable_ and the highest level (root) CA. It should
# end with the server key. See 'docs/security.txt' or the Security chapter of
# NUT user manual for more information on the SSL support in NUT.
#
# See 'docs/security.txt' or the Security chapter of NUT user manual
# for more information on the SSL support in NUT.

# =======================================================================
# CERTPATH <certificate file or directory>
# CERTPATH /usr/local/ups/etc/cert/upsd
#
# When compiled with SSL support with NSS backend,
# you can enter the certificate path here.
# Certificates are stored in a dedicated database (splitted in 3 files).
# Specify the path of the database directory.
# 
# See 'docs/security.txt' or the Security chapter of NUT user manual
# for more information on the SSL support in NUT.

# =======================================================================
# CERTIDENT <certificate name> <database password>
# CERTIDENT "my nut server" "MyPasSw0rD"
#
# When compiled with SSL support with NSS backend,
# you can specify the certificate name to retrieve from database to
# authenticate itself and the password
# required to access certificate related private key.
# 
# See 'docs/security.txt' or the Security chapter of NUT user manual
# for more information on the SSL support in NUT.

# =======================================================================
# CERTREQUEST <certificate request level>
# CERTREQUEST REQUIRE
#
# When compiled with SSL support with NSS backend and client certificate
# validation (disabled by default, see 'docs/security.txt'),
# you can specify if upsd requests or requires client's' certificates.
# Possible values are :
#  - 0 to not request to clients to provide any certificate
#  - 1 to require to all clients a certificate
#  - 2 to require to all clients a valid certificate
# 
# See 'docs/security.txt' or the Security chapter of NUT user manual
# for more information on the SSL support in NUT.

LISTEN 127.0.0.1 3493
LISTEN ::1 3493

Etape 7 :
nano /etc/nut/upsd.users

# Network UPS Tools: Example upsd.users
#
# This file sets the permissions for upsd - the UPS network daemon.
# Users are defined here, are given passwords, and their privileges are
# controlled here too.  Since this file will contain passwords, keep it
# secure, with only enough permissions for upsd to read it.

# --------------------------------------------------------------------------

# Each user gets a section.  To start a section, put the username in
# brackets on a line by itself.  To set something for that user, specify
# it under that section heading.  The username is case-sensitive, so
# admin and AdMiN are two different users.
#
# Possible settings:
#
# password: The user's password.  This is case-sensitive.
#
# --------------------------------------------------------------------------
#
# actions: Let the user do certain things with upsd.  
# 
# Valid actions are:
#
# SET   - change the value of certain variables in the UPS
# FSD   - set the "forced shutdown" flag in the UPS
# 
# --------------------------------------------------------------------------
#
# instcmds: Let the user initiate specific instant commands.  Use "ALL"
# to grant all commands automatically.  There are many possible  
# commands, so use 'upscmd -l' to see what your hardware supports.  Here
# are a few examples:
##
# test.panel.start      - Start a front panel test
# test.battery.start    - Start battery test
# test.battery.stop     - Stop battery test
# calibrate.start       - Start calibration
# calibrate.stop        - Stop calibration
#
# --------------------------------------------------------------------------
#
# Example:
#
#       [admin]
#               password = mypass
#               actions = SET
#               instcmds = ALL
#

#
# --- Configuring for a user who can execute tests only
#
#       [testuser]
#               password  = pass
#               instcmds  = test.battery.start
#               instcmds  = test.battery.stop

#
# --- Configuring for upsmon
#
# To add a user for your upsmon, use this example:
#
#       [upsmon]
#               password  = pass
#               upsmon master
# or
#               upsmon slave
#
# The matching MONITOR line in your upsmon.conf would look like this:
#
# MONITOR myups@localhost 1 upsmon pass master  (or slave)
[upsmonitor
password = (mon mot passe perso)
upsmon master]

nano /etc/nut/upsmon.conf

# that nobody can sniff your sessions without a large effort.  Setting
# this will make upsmon drop connections if the remote upsd doesn't
# support SSL, so don't use it unless all of them have it running.
# When compiled with NSS support of SSL, can be overriden for host 
# specified with a CERTHOST directive.
# Commands for shutdown on power loss
SHUTDOWNCMD "/sbin/shutdown -h now"
HOSTSYNC 15
POWERDOWNFLAG /etc/killpower
FINALDELAY 5
NOTIFYCMD /sbin/upssched
NOTIFYMSG ONBATT "%s fonctionne sur batterie"
NOTIFYMSG ONLINE "%s fonctionne de nouveau sur secteur"
NOTIFYMSG LOWBATT "%s indique une batterie faible !"
NOTIFYMSG SHUTDOWN "Le système est entrain de d'éteindre !"

NOTIFYFLAG ONLINE SYSLOG+EXEC
NOTIFYFLAG ONBATT SYSLOG+EXEC
NOTIFYFLAG LOWBATT SYSLOG+EXEC
NOTIFYFLAG FSD SYSLOG+WALL+EXEC
NOTIFYFLAG COMMOK SYSLOG+EXEC
NOTIFYFLAG COMMBAD SYSLOG+EXEC
NOTIFYFLAG SHUTDOWN SYSLOG+EXEC
NOTIFYFLAG REPLBATT SYSLOG+EXEC
NOTIFYFLAG NOCOMM SYSLOG+EXEC
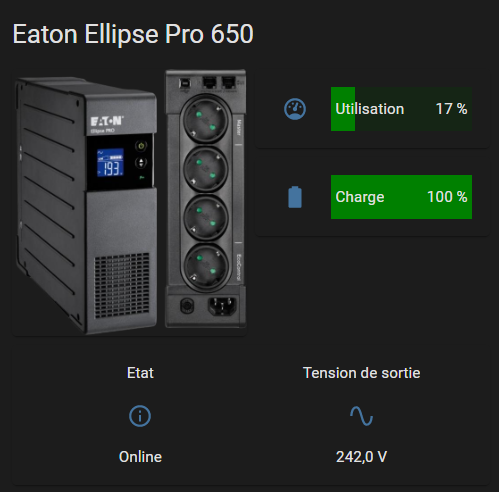
#ONDULEUR
MONITOR eaton@localhost 1 upsmonitor 84monUPSlcscps master
chown root:nut /etc/nut/*
chmod 640 /etc/nut/*

Etape 8 :

upsd

root@proxmox:~# upsd
Network UPS Tools upsd 2.7.4
Fatal error: A previous upsd instance is already running!
Either stop the previous instance first, or use the 'reload' command.

C’est là que ça coince.

Tu as déjà le processus upsd qui fonctionne, donc tu ne peux logiquement pas en faire un deuxième.
Passe à l’étape 9 pour voir

root@proxmox:~# upsc eaton@localhost
Init SSL without certificate database
battery.charge: 100
battery.charge.low: 20
battery.runtime: 2525
battery.type: PbAc
device.mfr: EATON
device.model: Ellipse PRO 650 
device.serial: G355N17239
device.type: ups
driver.name: usbhid-ups
driver.parameter.pollfreq: 30
driver.parameter.pollinterval: 2
driver.parameter.port: auto
driver.parameter.synchronous: no
driver.version: 2.7.4
driver.version.data: MGE HID 1.40
driver.version.internal: 0.41
input.frequency: 50.0
input.transfer.high: 285
input.transfer.low: 165
input.voltage: 237.0
input.voltage.extended: no
outlet.1.desc: PowerShare Outlet 1
outlet.1.id: 2
outlet.1.status: on
outlet.1.switchable: no
outlet.2.desc: PowerShare Outlet 2
outlet.2.id: 3
outlet.2.status: on
outlet.2.switchable: no
outlet.desc: Main Outlet
outlet.id: 1
outlet.switchable: no
output.frequency: 50.0
output.frequency.nominal: 50
output.voltage: 238.0
output.voltage.nominal: 230
ups.beeper.status: enabled
ups.delay.shutdown: 20
ups.delay.start: 30
ups.firmware: 01.18.0022
ups.load: 12
ups.mfr: EATON
ups.model: Ellipse PRO 650 
ups.power: 81
ups.power.nominal: 650
ups.productid: ffff
ups.realpower: 42
ups.serial: G355N17239
ups.status: OL
ups.timer.shutdown: 0
ups.timer.start: 0
ups.vendorid: 0463

Je ne sais pas ce que j’ai bidouillé mais ça m’a l’air de fonctionner maintenant.
Je vais tester ton script du coup

Si je lance cette commande je n’ai pas de retour

root@proxmox:~# /etc/init.d/ups-monitor status
root@proxmox:~#