Salut,
J’ai un Home Assitant qui tourne sous Docker, et je galère avec un truc.
J’ai utilisé un carte ESP32-C6 (xiao, j’adore le format) pour étendre mon réseau zigbee.
Elle fonctionne avec batterie + panneau solaire, au fond du jardin.
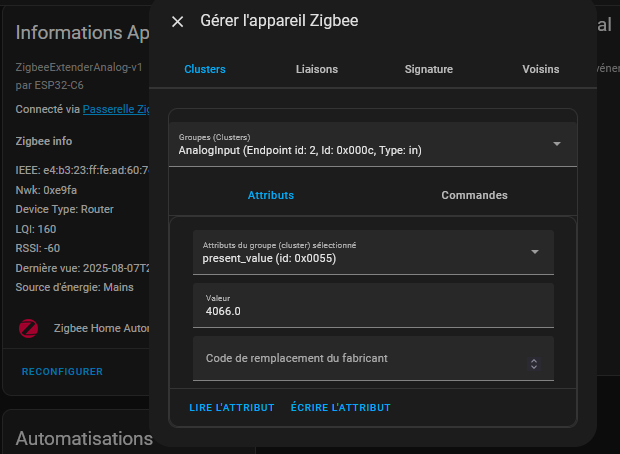
Sur l’interface home assitant, je ne vois par contre pas la valeur de la batterie (analog input) par défaut, mais lorsque je vais dans la gestion de l’apareil, j’arrive bien a lire la « present value ».
Comment faire pour pouvoir l’exploiter ? qu’elle soit considérer comme un sensor ou quelque chose du genre ? (pour avoir l’historique et pouvoir l’utiliser sur mes dashboard)
La valeur se trouve par la :
ieee: e4:b3:23:ff:fe:ad:60:7c
endpoint_id: 2
cluster_id: 12
attribut du groupe: 85
=> J’ai installé l’intégration zha_toolkit pour avoir la possibilité de lancer des commandes zha et pouvoir lire ma variable.
(Premiere intégration ajoutée manuelle sur mon container Docker, mais plutôt très simple).
Après, création d’une automatisation pour lire la valeur de mon esp32-c6 et la convertir/stocker dans une variable.
J’ai un router basé sur un esp32-c6 firebeetle2 sur batterie avec panneau solaire et une sonde dallas voila mon code si cela peut t’aider:
//routeur solaire zigbee ds18b20
// Copyright 2025 Espressif Systems (Shanghai) PTE LTD
//
// Licensed under the Apache License, Version 2.0 (the "License");
// you may not use this file except in compliance with the License.
// You may obtain a copy of the License at
//
//     http://www.apache.org/licenses/LICENSE-2.0
//
// Unless required by applicable law or agreed to in writing, software
// distributed under the License is distributed on an "AS IS" BASIS,
// WITHOUT WARRANTIES OR CONDITIONS OF ANY KIND, either express or implied.
// See the License for the specific language governing permissions and
// limitations under the License.

/**
 * @brief This example demonstrates simple Zigbee Range Extender (router).
 *
 * The example demonstrates how to use Zigbee library to create a Zigbee network ragbe extender (router).
 *
 * Proper Zigbee mode must be selected in Tools->Zigbee mode
 * and also the correct partition scheme must be selected in Tools->Partition Scheme.
 *
 * Please check the README.md for instructions and more detailed description.
 *
 * Created by Jan Procházka (https://github.com/P-R-O-C-H-Y/)
 */

#ifndef ZIGBEE_MODE_ZCZR
#error "Zigbee coordinator/router mode is not selected in Tools->Zigbee mode"
#endif

#include "Zigbee.h"

/* Zigbee light bulb configuration */
#define USE_CUSTOM_ZIGBEE_CONFIG 1
#define ZIGBEE_EXTENDER_ENDPOINT 1

#ifndef LED_BUILTIN
#define LED_BUILTIN 4
#endif

uint8_t led = LED_BUILTIN;
uint8_t button = BOOT_PIN;

ZigbeeRangeExtender zbExtender = ZigbeeRangeExtender(ZIGBEE_EXTENDER_ENDPOINT);

#include "OneWireNg_CurrentPlatform.h"
#include "drivers/DSTherm.h"
#include "utils/Placeholder.h"
#include "Zigbee.h"

#define OW_PIN 2  // Broche de connexion du DS18B20
//#define TEMP_SENSOR_ENDPOINT_NUMBER 10
#define BUTTON_PIN BOOT_PIN

ZigbeeTempSensor zbTempSensor(ZIGBEE_EXTENDER_ENDPOINT);
static Placeholder<OneWireNg_CurrentPlatform> ow;

//BAT
// 3.7 V Li-Ion battery voltage
const float minVoltage = 3.0;
const float maxVoltage = 4.2;
// Mapp float values to percentage
uint8_t mapFloat(float x, float in_min, float in_max) {
  float val;
  val = (x - in_min) * (100) / (in_max - in_min);
  if (val < 0) {
    val = 0;
  } else if (val > 100) {
    val = 100;
  }
  return (uint8_t)val;
}
// Get battery voltage en V
float getVbatt() {
  uint32_t Vbatt = 0;
  for (int i = 0; i < 16; i++) {
    Vbatt += analogReadMilliVolts(0);  // Read and accumulate ADC voltage
  }
  return (2 * Vbatt / 16 / 1000.0);  // Adjust for 1:2 divider and convert to volts
}


/************************** Identify ******************************/
// Create a task on identify call to handle the identify function
void identify(uint16_t time) {
  static uint8_t blink = 1;
  log_d("Identify called for %d seconds", time);
  if (time == 0) {
    digitalWrite(led, LOW);
    return;
  }
  digitalWrite(led, blink);
  blink = !blink;
}

/********************* Arduino functions **************************/
void setup() {
  Serial.begin(115200);

  pinMode(BUTTON_PIN, INPUT_PULLUP);
  analogReadResolution(12);

  // Initialisation du bus 1-Wire
  new (&ow) OneWireNg_CurrentPlatform(OW_PIN, false);

  // Configuration du capteur Zigbee
  zbTempSensor.setManufacturerAndModel("Espressif", "ZigbeeTempSensor2");
  zbTempSensor.setMinMaxValue(-55, 125); // Plage de température du DS18B20
  zbTempSensor.setTolerance(0.25);

  // Ajout de l'endpoint Zigbee
  Zigbee.addEndpoint(&zbTempSensor);

  // Init LED and turn it OFF (if LED_PIN == RGB_BUILTIN, the rgbLedWrite() will be used under the hood)
  pinMode(led, OUTPUT);
  digitalWrite(led, LOW);

  // Init button for factory reset
  pinMode(button, INPUT_PULLUP);

  // Optional: Set callback function for device identify
  zbExtender.onIdentify(identify);

  // Set power source to battery, battery percentage and battery voltage (now 100% and 3.5V for demonstration)
  // The value can be also updated by calling zbTempSensor.setBatteryPercentage(percentage) or zbTempSensor.setBatteryVoltage(voltage) anytime after Zigbee.begin()
  zbTempSensor.setPowerSource(ZB_POWER_SOURCE_BATTERY, 100, 35);

  // Optional: Set Zigbee device name and model
  zbExtender.setManufacturerAndModel("Espressif", "ZigbeeRangeExtender");

  // Add endpoint to Zigbee Core
  Serial.println("Adding Zigbee Extender endpoint to Zigbee Core");
  Zigbee.addEndpoint(&zbExtender);

#if USE_CUSTOM_ZIGBEE_CONFIG
  // Optional: Create a custom Zigbee configuration for Zigbee Extender
  esp_zb_cfg_t zigbeeConfig = ZIGBEE_DEFAULT_ROUTER_CONFIG();
  zigbeeConfig.nwk_cfg.zczr_cfg.max_children = 20;  // 10 is default

  // When all EPs are registered, start Zigbee with custom config
  if (!Zigbee.begin(&zigbeeConfig)) {
#else
  // When all EPs are registered, start Zigbee as ROUTER device
  if (!Zigbee.begin(ZIGBEE_ROUTER)) {
#endif
    Serial.println("Zigbee failed to start!");
    Serial.println("Rebooting...");
    ESP.restart();
  }
  Serial.println("Connecting to network");
  while (!Zigbee.connected()) {
    Serial.print(".");
    delay(100);
  }
  Serial.println();

  // Lancement de la tâche de lecture du capteur
  xTaskCreate(temp_sensor_value_update, "temp_sensor_update", 2048, NULL, 10, NULL);
  zbTempSensor.setReporting(1, 0, 1);
}

void temp_sensor_value_update(void *arg) {
  uint8_t percentage;
  float vBat;
  // Measure battery voltage
  vBat = getVbatt();
  percentage = mapFloat(vBat, minVoltage, maxVoltage);
  // Update battery percentage
  zbTempSensor.setBatteryPercentage(percentage);
  zbTempSensor.setBatteryVoltage(vBat * 10);  // voltage in 100mV
  DSTherm drv(ow);
  Placeholder<DSTherm::Scratchpad> scrpd;
  for (;;) {
    drv.convertTempAll(DSTherm::MAX_CONV_TIME, false);
    if (drv.readScratchpadSingle(scrpd) == OneWireNg::EC_SUCCESS) {
      float temperature = scrpd->getTemp2() / 16.0;
      Serial.printf("Temperature DS18B20: %.2f°C\r\n", temperature);
      zbTempSensor.setTemperature(temperature);
    } else {
      Serial.println("Erreur de lecture du capteur DS18B20");
    }
    delay(1000);
  }
}

void loop() {
  // Checking button for factory reset
  if (digitalRead(button) == LOW) {  // Push button pressed
    // Key debounce handling
    delay(100);
    int startTime = millis();
    while (digitalRead(button) == LOW) {
      delay(50);
      if ((millis() - startTime) > 3000) {
        // If key pressed for more than 3secs, factory reset Zigbee and reboot
        Serial.println("Resetting Zigbee to factory and rebooting in 1s.");
        delay(1000);
        Zigbee.factoryReset();
      }
    }
  zbTempSensor.reportTemperature();
  zbTempSensor.reportBatteryPercentage();
  }
  delay(100);
}
Super merci !
J’ai pas trouvé grand chose en exemple de code avec la fonction routeur donc j’ai du tatonner sur le code arduino. Et bien sur quand il y a une erreur, sa compile bien, mais la carte reboot en boucle.
En tout cas, grace à ton code, je vois des conneries sur le miens. Avec un peu de chance, une fois corrigées, j’aurais une meilleurs prise en charge par ZHA
Tu l’a intégré dans Home assitant comment ? Avec l’intégration ZHA, ZHA_toolkit, Z2M ou autre ?