Bonjour.
le code :
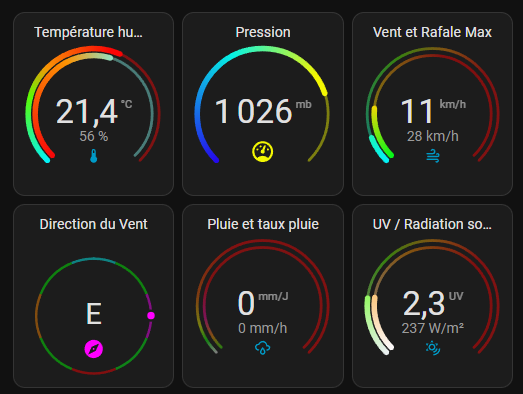
type: custom:modern-circular-gauge
entity: sensor.direction_du_vent
secondary: {}
header_position: top
gauge_type: full
min: 0
max: 360
show_entity_picture: false
combine_gauges: false
rotate_gauge: true
name: Direction du Vent
show_icon: true
adaptive_icon_color: true
show_header: true
needle: true
segments:
  - from: 0
    color:
      - 0
      - 255
      - 255
    label: "N"
  - color:
      - 0
      - 255
      - 0
    label: NE
    from: 22.5
  - label: E
    color:
      - 255
      - 0
      - 255
    from: 67.5
  - color:
      - 0
      - 255
      - 17
    label: SE
    from: 112.5
  - color:
      - 255
      - 0
      - 0
    label: S
    from: 157.5
  - from: 202.5
    color:
      - 0
      - 255
      - 0
    label: SO
  - from: 247.5
    color:
      - 255
      - 136
      - 0
    label: O
  - from: 292.5
    color:
      - 0
      - 255
      - 0
    label: "NO"
  - from: 337.5
    color:
      - 0
      - 255
      - 255
    label: "N"
gauge_foreground_style:
  color: adaptive
  gauge_background_style:
  width: 12
gauge_background_style:
  width: 2
  color: adaptive
unit: ""
grid_options:
  columns: 4
  rows: 3
La majorité du paramétrage peut être modifier avec l'editeur visuel
Hé, c'est sympa tes autres cartes aussi...
tu pourrait nous donner les codes ?
Ricky11:
modern-circular-gauge
Salut,
Modern circular gauge card for Home Assistant
Oui, bien sur pas de problème, même si le code n'est peut être pas optimisé car je suis loin d'être un expert !
type: custom:modern-circular-gauge
entity: sensor.temperature_exterieure
gauge_foreground_style:
  color: adaptive
gauge_background_style:
  width: 2
  color: adaptive
secondary:
  entity: sensor.humidite_exterieure
  unit: "%"
  state_size: small
  adaptive_state_color: false
  smooth_segments: true
  show_gauge: inner
  max: 100
  needle: false
  segments:
    - from: 0
      color:
        - 247
        - 8
        - 8
    - from: 40
      color:
        - 252
        - 148
        - 3
    - from: 60
      color:
        - 127
        - 240
        - 232
  gauge_foreground_style:
    color: adaptive
  gauge_background_style:
    width: 2
    color: adaptive
max: 40
min: -5
header_position: top
name: "Température  humidité  "
smooth_segments: true
needle: false
adaptive_icon_color: false
adaptive_state_color: false
segments:
  - color:
      - 4
      - 242
      - 246
    from: -5
  - from: 5
    color:
      - 90
      - 252
      - 3
  - from: 10
    color:
      - 249
      - 148
      - 6
  - color:
      - 250
      - 5
      - 5
    from: 20
grid_options:
  columns: 4
  rows: 3
tertiary: {}
Pression
type: custom:modern-circular-gauge
entity: sensor.pression_atmospherique
secondary: {}
name: Pression
gauge_foreground_style:
  color: adaptive
  width: 4
gauge_background_style:
  width: 2
  color: adaptive
max: 1050
header_position: top
needle: false
segments:
  - from: 950
    color:
      - 36
      - 10
      - 235
  - from: 990
    color:
      - 6
      - 244
      - 228
  - from: 1020
    color:
      - 243
      - 247
      - 2
smooth_segments: true
adaptive_icon_color: true
grid_options:
  columns: 4
  rows: 3
min: 950
unit: mb
show_header: true
adaptive_state_color: false
tertiary: {}
vent et rafale
type: custom:modern-circular-gauge
entity: sensor.rafale_de_vent_bresser
gauge_foreground_style:
  color: adaptive
gauge_background_style:
  width: 2
  color: adaptive
secondary:
  state_size: small
  adaptive_state_color: false
  show_gauge: inner
  smooth_segments: true
  max: 150
  needle: false
  segments:
    - from: 0
      color:
        - 8
        - 247
        - 24
    - from: 30
      color:
        - 246
        - 214
        - 4
    - from: 60
      color:
        - 246
        - 133
        - 4
    - from: 80
      color:
        - 255
        - 0
        - 0
  gauge_foreground_style:
    color: adaptive
  gauge_background_style:
    width: 2
    color: adaptive
  entity: sensor.rafale_vent_max
max: 130
min: 0
header_position: top
name: Vent et Rafale Max
smooth_segments: true
needle: false
adaptive_icon_color: false
adaptive_state_color: false
segments:
  - color:
      - 4
      - 242
      - 246
    from: 0
  - from: 50
    color:
      - 90
      - 252
      - 3
  - from: 70
    color:
      - 249
      - 148
      - 6
  - color:
      - 250
      - 5
      - 5
    from: 90
grid_options:
  columns: 4
  rows: 3
tertiary: {}
Pluie
type: custom:modern-circular-gauge
entity: sensor.daily_rain
gauge_foreground_style:
  color: adaptive
gauge_background_style:
  width: 2
  color: adaptive
secondary:
  entity: sensor.pluie_horaire
  state_size: small
  adaptive_state_color: false
  show_gauge: inner
  smooth_segments: true
  needle: false
  segments:
    - from: 0
      color:
        - 69
        - 237
        - 7
    - from: 2
      color:
        - 252
        - 148
        - 3
    - from: 5
      color:
        - 242
        - 7
        - 156
    - from: 10
      color:
        - 245
        - 5
        - 5
  gauge_foreground_style:
    color: adaptive
  gauge_background_style:
    width: 2
    color: adaptive
  unit: mm/h
  max: 40
max: 200
min: 0
header_position: top
name: Pluie et taux pluie
smooth_segments: true
needle: false
adaptive_icon_color: false
adaptive_state_color: false
segments:
  - color:
      - 241
      - 244
      - 240
    from: 0
  - from: 10
    color:
      - 10
      - 249
      - 6
  - from: 20
    color:
      - 232
      - 249
      - 6
  - color:
      - 242
      - 98
      - 2
    from: 40
  - from: 80
    color:
      - 252
      - 3
      - 3
grid_options:
  columns: 4
  rows: 3
tertiary: {}
icon: mdi:weather-rainy
unit: mm/J
UV
type: custom:modern-circular-gauge
entity: sensor.index_uv
gauge_foreground_style:
  color: adaptive
gauge_background_style:
  width: 2
  color: adaptive
secondary:
  entity: sensor.radiation_solaire
  state_size: small
  adaptive_state_color: false
  show_gauge: inner
  smooth_segments: true
  max: 1200
  needle: false
  segments:
    - from: 0
      color:
        - 251
        - 249
        - 249
    - from: 500
      color:
        - 252
        - 148
        - 3
    - from: 800
      color:
        - 250
        - 0
        - 0
  gauge_foreground_style:
    color: adaptive
  gauge_background_style:
    width: 2
    color: adaptive
max: 12
min: 0
header_position: top
name: UV / Radiation  solaire
smooth_segments: true
needle: false
adaptive_icon_color: false
adaptive_state_color: false
segments:
  - color:
      - 234
      - 240
      - 241
    from: 0
  - from: 4
    color:
      - 90
      - 252
      - 3
  - from: 6
    color:
      - 249
      - 148
      - 6
  - color:
      - 250
      - 5
      - 5
    from: 8
grid_options:
  columns: 4
  rows: 3
tertiary: {}
unit: UV
icon: mdi:sun-wireless-outline
Dans mon cas le valeurs viennent de l'intégration Personal Weather Station, mais elle peuvent être récupérées aussi avec l'intégration Wundergroundpws.
Tu as raison, mais malgré la lecture de la doc, je n'ai toujours pas compris comment utiliser les "templates"....
Tu as au choix du JavaScript ou du Jinja en format de template. C'est la même utilisation que le template classique.
des exemples :
secondary: >-
  {% if is_state("binary_sensor.room_temp_rising", "on") %}
  Rising
  {% elif is_state("binary_sensor.room_temp_falling", "on") %}
  Falling
  {% endif %}
icon: >-
  {% if is_state("binary_sensor.room_temp_rising", "on") %}
  mdi:thermometer-chevron-up
  {% elif is_state("binary_sensor.room_temp_falling","on") %}
  mdi:thermometer-chevron-down
  {% endif %}
en fait j'ai vu que sur chaque paramètre de l'éditeur visuel il est noté "switch to template", est ce que ce Template permettrait par exemple d'éviter de ressaisir le différents segments (valeur et couleur), pour chaque segment je saisie manuellement les valeurs RGB, est-ce que je pourrait faire un Template exemple pour le rouge =R255, V=0 B=0 ?
Tu copies le code en YAML et le réutilises sur une autre carte, c'est pas compliqué. Après en template, je ne sais pas comment ça fonctionnerait pour des segments de couleur, j'ai jamais essayé.
Ok, c'est effectivement ce que je fais, je créé des cartes de référence et après je la (les) duplique et j'ajuste éventuellement les paramètres, je pensais que les "templates" permettaient de faire un truc un peu plus clean