Bonjour
Et voici. À reproduire autant de fois que de caméra ![]()
type: picture-entity
entity: switch.dalg_cam1
image: https://demo.home-assistant.io/stub_config/bedroom.png
name: Caméra 1
camera_image: camera.dalg_cam1
camera_view: live
Bonjour
Et voici. À reproduire autant de fois que de caméra ![]()
type: picture-entity
entity: switch.dalg_cam1
image: https://demo.home-assistant.io/stub_config/bedroom.png
name: Caméra 1
camera_image: camera.dalg_cam1
camera_view: live
Top fonctionne pour netatmo tu crois? Merci
Je pense que oui. Moi je passe par une intégration Unifi pour récupérer mes caméras.
Il y a en peut être une pour Netatmo…
Je vais essayer ca merci !
Bonjour,
super taff pour un « début ». Je découvre Home Assistant depuis quelques jours et je trouve tes design top ![]()
Tu pourrais partager ceux pour les températures stp ?
Merci
Salut,
Merci ![]()
Et voici le code pour mes card température
entities:
  - entity: sensor.lumi_lumi_weather_temperature
    name: Température
    type: custom:multiple-entity-row
    style: |
      .entity:not(.state)>div {
        color: var(--secondary-text-color);
      }
    state_header: Actuelle
    entities:
      - entity: sensor.salon_temp_min
        name: Min
      - entity: sensor.salon_temp_max
        name: Max
  - entity: sensor.lumi_lumi_weather_humidity
    name: Humidité
  - entity: sensor.xiaomi_lumi_sen_ill_mgl01_illuminance
    name: Luminosité
  - type: custom:swipe-card
    reset_after: 5
    parameters:
      roundLengths: true
      effect: coverflow
      speed: 650
      spaceBetween: 20
      threshold: 7
      coverflowEffect:
        rotate: 80
        depth: 300
        start_card: 1
    cards:
      - type: custom:hui-element
        card_type: horizontal-stack
        cards:
          - type: custom:mini-graph-card
            align_icon: state
            line_width: 3
            color_thresholds:
              - color: '#ef1d0f'
                value: 25
              - color: '#ef5a0f'
                value: 24
              - color: '#f0da11'
                value: 22
              - color: '#11f13a'
                value: 19
              - color: '#1da4f2'
                value: 15
            entities:
              - entity: sensor.lumi_lumi_weather_temperature
                index: 0
            hour24: true
            more_info: false
            points_per_hour: 1
            show:
              labels: false
              name: false
          - type: custom:mini-graph-card
            align_icon: state
            entities:
              - entity: sensor.lumi_lumi_weather_humidity
                index: 0
            hour24: true
            line_color: '#1da4f2'
            more_info: false
            name: Salon
            line_width: 3
            points_per_hour: 1
            show:
              labels: false
              name: false
      - type: custom:hui-element
        card_type: horizontal-stack
        cards:
          - type: custom:mini-graph-card
            align_icon: state
            entities:
              - entity: sensor.lumi_lumi_weather_pressure
                index: 0
            hour24: true
            line_color: '#ff0000'
            more_info: false
            name: Salon
            line_width: 3
            points_per_hour: 1
            show:
              labels: false
              name: false
          - type: custom:mini-graph-card
            align_icon: state
            entities:
              - entity: sensor.lumi_lumi_weather_power
                index: 0
            hour24: true
            line_color: '#A700FF'
            more_info: false
            name: Salon
            line_width: 3
            points_per_hour: 1
            show:
              graph: bar
              labels: false
              name: false
title: Salon

saisissez ou collez du code ici
Et il faut rajouter des sensors dans sensors.yaml pour les min max
  - platform: statistics
    entity_id: sensor.lumi_lumi_weather_temperature
    sampling_size: 144
    name: stats_temp_salon
  - platform: template
    sensors:
     salon_temp_min:
       value_template: "{{ state_attr('sensor.stats_temp_salon', 'min_value') }}"
     salon_temp_max:
       value_template: "{{ state_attr('sensor.stats_temp_salon', 'max_value') }}"
A reproduire autant de fois que de sondes
Cdt
PS: j’utilise le thème Home Assistant « Noctis » disponible dans HACS
Et ne pas oublié d’installer les frontend dans HACS qui vont bien (‹ layout-card ›, ‹ hui-element ›, ‹ swipe card ›…j’en passe et des meilleurs)
Redis-moi si besoin
merci pour ces précisions, je vais étudier ça ![]()
dans le code de ta carte il manque cette ligne en haut :
type: entities
la carte fonctionne excepté pour les min max
voici le code pour ces min max
  - platform: statistics
    entity_id: sensor.temperature_158d0002797a32
    sampling_size: 144
    name: stats_temp_mia
    max_age:
      hours: 24
  - platform: template
    sensors:
      mia_temp_min:
        value_template: "{{ state_attr('sensor.stats_temp_mia', 'min_value') }}"
      mia_temp_max:
        value_template: "{{ state_attr('sensor.stats_temp_mia', 'max_value') }}"
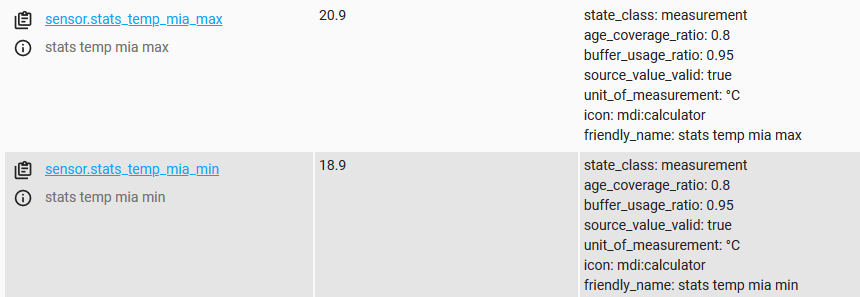
bizarrement je n’ai pas ces attributs dans min_value et max_value pour sensor.stats_temp_mia
je n’ai que cela
state_class: measurement
age_coverage_ratio: 0.98
buffer_usage_ratio: 0.29
source_value_valid: true
unit_of_measurement: °C
icon: mdi:calculator
friendly_name: stats_temp_mia
Hello
Certainement un oubli dans le copier/coller (pour le « type: entities ») ![]()
Pour les valeurs min/max, il faut impérativement redémarrer HA pour les voir apparaître. L’as-tu fais?
Tu auras alors de nouveaux sensors. Pour reprendre l’exemple du dessus, moi j’ai sensor.salon_temp_min et sensor.salon_temp_max avec les valeurs associées.
oui je pense bien a rédémarrer à chaque fois
Le sensor est bien créé « sensor.mia_temp_min » mais avec comme valeur « unknown »
Le problème viens de platform: statistics qui ne me créé que ces attributs
state_class: measurement
age_coverage_ratio: 0.96
buffer_usage_ratio: 0.23
source_value_valid: true
unit_of_measurement: °C
icon: mdi:calculator
friendly_name: stats_temp_mia
J’ai réussi en suivant ce post
J’ai donc du créer 2 sensors
  - platform: statistics
    name: stats temp mia min
    entity_id: sensor.temperature_158d0002797a32
    state_characteristic: value_min #mean
    max_age:
      hours: 24
    sampling_size: 20
  - platform: statistics
    name: stats temp mia max
    entity_id: sensor.temperature_158d0002797a32
    state_characteristic: value_max #mean
    max_age:
      hours: 24
    sampling_size: 20
et là ça fonctionne
Bonjour,
je n’arrive pas à afficher la carte pop-up.
J’ai modifié le code pour supprimer la consommation électrique et je ne comprend pas ce que j’ai loupé …
Pouvez-vous m’éclairer ?
Voici mon code:
type: custom:button-card
entity: switch.bfd5b5b70a310ac77aqn4h
name: Salon
icon: custom
styles:
  icon:
    - top: '-2%'
    - left: 3%
    - width: 30%
    - position: absolute
  name:
    - top: 80%
    - left: 15%
    - position: center
    - color: rgba(240, 240, 240, 0.8)
  card:
    - font-size: 80%
    - background-color: rgba(240, 240, 240, 0.1)
    - border-radius: 15%
    - border-style: solid
    - border-color: rgba(240, 240, 240, 0.3)
    - border-width: 1px
    - box-shadow: true
    - transition: true
  custom_fields:
    icon_hue:
      - top: 18%
      - left: 4.5%
      - width: 45%
      - position: absolute
custom_fields:
  icon_hue: |
    [[[
      const state = entity.state === 'on' ? 'animate' : null;
      return `
        <svg viewBox="0 0 50 50">
          <style>
            @keyframes animate {
              0% {
                transform: scale(0.85);
              }
              20% {
                transform: scale(1.1);
              }
              40% {
                transform: scale(0.95);
              }
              60% {
                transform: scale(1.03);
              }
              80% {
                transform: scale(0.97);
              }
              100% {
                transform: scale(1);
              }
              }
              .animate {
              animation: animate 0.8s;
              transform-origin: center;
            }
          </style>
          <path fill="#9da0a2" d="M27.4 47.3h-4.9s-.7.1-.7.8.4.9.7.9h4.9c.3 0 .7-.1.7-.9s-.7-.8-.7-.8zm3.3-2.9H19.3s-.8 0-.8.8.6.9.8.9h11.5c.2 0 .8-.1.8-.9-.1-.8-.9-.8-.9-.8zm0-3H19.3s-.8 0-.8.8.6.9.8.9h11.5c.2 0 .8-.1.8-.9-.1-.8-.9-.8-.9-.8zm0-2.9H19.3s-.8 0-.8.8.6.9.8.9h11.5c.2 0 .8-.1.8-.9s-.9-.8-.9-.8zm5.2-23.2c-3.3-5.3-7-5.6-10.9-5.6-3.8 0-8.4.4-10.9 5.6-.1.1-.1.3.1.7.4.8 3.3 7.2 3.2 18.8 0 1.1-.1 1.6 0 1.7 0 .1 0 .7 1.1.7h13c1 0 1-.5 1.1-.7v-1.7c-.1-11.6 2.8-18 3.2-18.8.1-.4.1-.5.1-.7"/>
          <path class="${state}" fill="var(--button-card-light-color-no-temperature)" d="M14.1 15.3c3.4-.3 7-.4 10.9-.4 3.8 0 7.5.2 10.9.4.4-.4.7-.8.9-1.1C39 8.5 38.9 6.5 38.9 6c-.2-4.4-8.4-5-12.1-5h0-3.4c-3.7 0-12 .5-12.1 5 0 .5-.1 2.5 2.1 8.2 0 .3.3.8.7 1.1z"/>
        </svg>
      `;
    ]]]
aspect_ratio: 1/1
state:
  - value: 'on'
    styles:
      card:
        - background-color: rgba(255, 255, 255, 0.8)
        - border: 1px rgba(80, 80, 80) solid
      name:
        - color: rgba(0, 0, 0, 0.6)
      icon:
        - color: var(--button-card-light-color-no-temperature)
hold_action:
  action: fire-dom-event
  browser_mod:
    command: popup
    title: Lumière Salon
    card:
      - type: entities
        state_color: true
        entities:
          - entity: switch.bfd5b5b70a310ac77aqn4h_on_off

`)``Salut,
As-tu ajouté cette commande dans ton configuration.yaml :
######### BROWSER_MOD #########
###############################

browser_mod:
J’ai également ajouté ces paramètres dans l’éditeur de configuration de lovelace-ui :
button_card_templates:
  thermometre:
    template: null
    aspect_ratio: 1/1
    show_state: true
    show_icon: false
    state:
      - value: 'on'
        styles:
          card:
            - background-color: rgba(255, 255, 255, 0.8)
          name:
            - color: rgba(0, 0, 0, 0.6)
          state:
            - color: rgba(0, 0, 0, 0.6)
    tap_action:
      ui_sound: >
        [[[ if (entity.state === 'off' &&
        states['switch.fullykiosk_screensaver'].state === 'off') {

        hass.callService('media_player', 'play_media', {entity_id:
        'media_player.tablet', media_content_id: '/local/sound/on.m4a',
        media_content_type: 'music'}); }

        else if (entity.state === 'on' &&
        states['switch.fullykiosk_screensaver'].state === 'off') {

        hass.callService('media_player', 'play_media', {entity_id:
        'media_player.tablet', media_content_id: '/local/sound/off.m4a',
        media_content_type: 'music'}); } ]]]
    styles:
      custom_fields:
        icon:
          - top: 11.5%
          - left: 11.5%
          - width: 2.9vw
          - position: absolute
        circle:
          - top: 8.5%
          - left: 56.2%
          - width: 3.5vw
          - position: absolute
          - letter-spacing: 0.03vw
          - fill: '#9da0a2'
      name:
        - top: 57.7%
        - left: 11%
        - line-height: 2vw
        - position: absolute
      state:
        - top: 74%
        - left: 11%
        - line-height: 2vw
        - position: absolute
      card:
        - font-family: Sf Display
        - letter-spacing: 0.05vw
        - font-weight: 400
        - color: rgba(255, 255, 255, 0.3)
        - font-size: 1.34vw
        - background-color: rgba(115, 115, 115, 0.2)
        - border-radius: 0.8vw
        - box-shadow: none
        - transition: none
Salut Guizmos,
je l’avais ajouté mais ça ne fonctionnait pas.
J’ai redémarré ce matin et depuis ça fonctionne ![]()
Merci ![]()
Salut Guizmos, tes card que tu a rajouter sont très cool , tu auras le code pour que j’en fasse un dans le même style ^^
Super, bonne nouvelle et good job ![]()
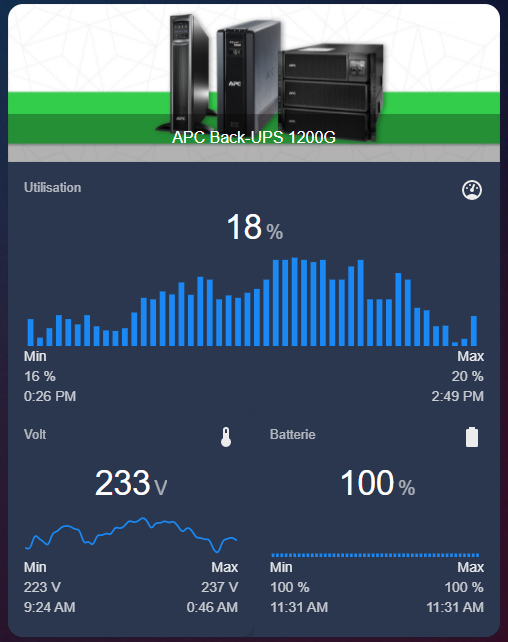
Voici la card de l’onduleur :
type: custom:vertical-stack-in-card
card_mod:
  style: |
    ha-card {
      margin-top: 0em;
        }
mode: vertical
cards:
  - type: picture-entity
    entity: binary_sensor.nas_security_status
    image: /local/images/apc.jpeg
    show_name: true
    show_state: false
    name: APC Back-UPS 1200G
    state_image:
      Sécurisé: /local/images/apc.jpeg
      'off': /local/images/apc.jpeg
    tap_action:
      action: none
    hold_action:
      action: none
  - type: custom:mini-graph-card
    card_mod:
      style: |
        ha-card {
          font-family: var(--primary-font-family);
          margin-bottom: -10px;
        }
        .graph {
          padding-top: 0px;
          padding-bottom: 0px;
        }
        .info {
          padding-bottom: 0px;
        }
        .flex {
          padding-bottom: 6px;
        }
    entities:
      - sensor.ups_load
    name: Utilisation
    align_state: center
    align_icon: right
    font_size: 100
    font_size_header: 11
    hours_to_show: 24
    line_color: var(--accent-color)
    line_width: 2
    animate: true
    points_per_hour: 2
    show:
      fill: false
      graph: bar
      upper_bound: 100
      extrema: true
      icon: true
      name: true
  - type: divider
    style:
      height: 1px
      width: 90%
      margin-left: auto
      margin-right: auto
      background: '#62717b'
  - type: horizontal-stack
    cards:
      - type: horizontal-stack
        cards:
          - type: custom:mini-graph-card
            card_mod:
              style: |
                ha-card {
                  font-family: var(--primary-font-family);
                }
                .graph {
                  padding-top: 0px;
                  padding-bottom: 0px;
                }
                .info {
                  padding-bottom: 0px;
                }
                .flex {
                  padding-bottom: 10px;
                }
            entities:
              - sensor.ups_input_voltage
            name: Volt
            align_state: center
            align_icon: right
            font_size: 100
            font_size_header: 11
            hours_to_show: 24
            line_color: var(--accent-color)
            line_width: 4
            animate: true
            points_per_hour: 2
            show:
              fill: false
              graph: line
              extrema: true
              icon: true
              name: true
      - type: custom:mini-graph-card
        card_mod:
          style: |
            ha-card {
              font-family: var(--primary-font-family);
            }
            .graph {
              padding-top: 0px;
              padding-bottom: 0px;
            }
            .info {
              padding-bottom: 0px;
            }
            .flex {
              padding-bottom: 10px;
            }
        entities:
          - sensor.ups_battery_charge
        name: Batterie
        align_state: center
        align_icon: right
        font_size: 100
        font_size_header: 11
        hours_to_show: 24
        line_color: var(--accent-color)
        line_width: 4
        animate: true
        points_per_hour: 2
        show:
          fill: false
          graph: bar
          extrema: true
          icon: true
          name: true
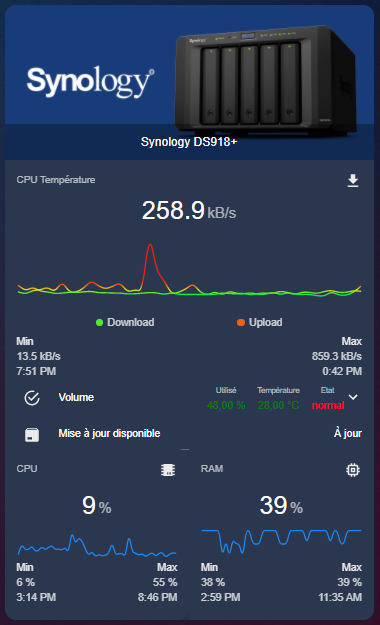
Mon onduleur est raccordé à mon NAS Synology via USB. Je récupère donc les infos de l’onduleur via le NAS.
Paramètres :
DSM :
HAAS: